Building a settlement....  

...is more than just creating a level or an area.

This new area I am working on is based on the level I submitted for the level-building community contest and it is a huge one! With a huge area, especially that area being a village comes the added task of populating it. Now, I have the plots for this village all written down but it is variable enough that the actual populace placement has to be finalized and additional things like ambient movement, non-critical NPCs, sub-plots, stages set up. What I've started doing nowadays is - as soon as each level is sort-of finalized, I export the minimap and put it into my Dropbox folder. Whenever I have free time at work, I open the level and start jotting down things on the image itself.

Plot-critical populace

Obviously, everything can't be fit into a single image so I use one for NPCs and any ideas I come up with when putting them down, another for quest flow and one for ambient movement. It varies with each area but I've felt a lot more focused when I am back home and open these images to translate the jottings into actual implementation. All the thinking is done during lunch and smoke breaks and once the toolset is opened, the goal is only to get as much of those thoughts implemented and nothing else.

Sometimes, I do get diverted. For example, I've been putting off tinting/recolouring items since the beginning and every now and then, I decide to start on it and go to the wiki. I still haven't managed to get through that tutorial, unfortunately so it just ends up as a wasted few minutes of diversion. I'm trying hard to stick to my plans for October and so far, it's going well. Still, a lot of days to go...

Till later,

Read More...

World Map Tutorial - Part 2  

In Part 1 of this tutorial, the basic setup for custom world maps was covered. In this tutorial, we will unravel the event flow when using world maps and the functionality that can be embedded in each of those event handlers.

First, a short illustration on the event flow tied to world map usage:

Event Flow related to World Map usage

It is good practice to define a primary world map in the EVENT_TYPE_MODULE_START event just to avoid any gotchas later. This just makes sure there is a world map displayed if the player initiates an unforeseen transition ;)
object oWorldMap = GetObjectByTag("<world map tag>");
WR_SetWorldMapPrimary(oWorldMap);

If you want, you can also set a secondary world map using:
WR_SetWorldMapSecondary(object oMapID);

What is the difference? A secondary map enables the second icon in the World Map allowing you to see both world maps. To give an example in the OC, it would be like Denerim and the Wide Open World. When in Denerim, doing a transition would take you to the Denerim map. Clicking the secondary map button would take you to the Wide Open World.

EVENT_TYPE_TRANSITION_TO_WORLD_MAP is the core event where you evaluate plot flags or put in checks to determine which world map to show and actually show the map.
SetWorldMapGuiStatus(WM_GUI_STATUS_USE);
OpenPrimaryWorldMap();

Two important checks (if you have the associated features in your module) that must be done here are:
If the player is exiting out of a random encounter, you have to make sure that the player continues on his way rather than selecting a new destination (this is just for the animation part)
if (GetEventString(ev, 1) == RANDOM_ENCOUNTER_TRANSITION_ID)
{
// exiting random - encounter - finish travel animation
WorldMapCompleteRandomEncounter();
break;
}

If the player is exiting out of a party camp and you want the Party Picker to be shown, you do it here
if(GetEventString(ev, 1) == CAMP_EXIT_TRANSITION_ID)
{
SetPartyPickerGUIStatus(PP_GUI_STATUS_USE);
ShowPartyPickerGUI();
break;
}

The constants used above are defined in the world_maps_h which is a core include and hence, can be included directly in your script - unless you want to change some of the functionality.

Once you show the World Map, the player can select a Map Pin to travel to. This triggers the EVENT_TYPE_BEGIN_TRAVEL where all the grunt work related to area-related plots, random encounters, camp travel is done. Finally, the WorldMapStartTravelling function is called to start the travel animation (important when random encounters are specified; otherwise they will not work)

A few important checks that are usually done here would be -
  • Check if waypoint overrides are set for the map pin (this is actually passed as an event parameter - GetEventString(ev, 2)
  • Handle random encounters - this is basically handled via plots unless you want really random encounters. In any case, this is scripted independently
  • Store the target map pin's area and waypoint tags - the area tag is passed as GetEventString(ev, 1) and the waypoint tag is determined from the waypoints 2da unless a waypoint override is present. This is important if you have random encounters (see EVENT_TYPE_WORLDMAP_PRETRANSITION event below)
  • SetLocalString(GetModule(), WM_STORED_AREA, sTarget); SetLocalString(GetModule(), WM_STORED_WP, sWP);
Camp related checks
  • Store the current location from which the world map was accessed so that when transitioning back, you can jump the party straight back
  • If source area is camp and, then basically don't do the animation trail. Jump the player back to the previous area (tied directly to the point above)
  • If the target area is camp, again, don't play the animation but do a direct transition
  • If source and target are both camps, empty the party and place the followers in their positions
EVENT_TYPE_WORLDMAP_PRETRANSITION is a pretty basic event that is called at the same time as the animation trail starts. All you do here is do the actual transition to the target area - except when the target area is the party camp, in which case it is done in EVENT_TYPE_BEGIN_TRAVEL itself. No fancy stuff here.
The one important thing to remember here is - the player will not be able to click on a map pin when exiting from a random encounter. Hence, you cannot get a target area from the event parameters. This is the reason why you store the target area and waypoint in the module variables in the EVENT_TYPE_BEGIN_TRAVEL event.
string sArea = GetLocalString(GetModule(), WM_STORED_AREA);
string sWP = GetLocalString(GetModule(), WM_STORED_WP);
UT_DoAreaTransition(sArea, sWP);

EVENT_TYPE_WORLDMAP_POSTTRANSITION is an optional event in the sense that it need not be handled for the world map to work correctly. However, this is a great area to do all those 'whats-happening-in-the-evil-genius'-lair' type of cutscenes. Remember the cutscenes with Loghain in the OC or the ones with The Valsharess in NWN-HotU? These can be done in this event.

EVENT_TYPE_WORLDMAP_CLOSED is also not a compulsory event unless you have a party camp in your module or multiple primary/secondary map combinations. The important (and only?) event parameter here is the first integer parameter:
GetEventInteger(ev,0) 
  • 0 when the world map action is cancelled by the player
  • 1 when it is closed after a travel is completed
Obviously, the above events can be analyzed and dissected even more but I don't plan to do that. The above information is enough to get world map transitions working in your module.

Now, let's get to the interesting part - customizations/changes from what's done in the OC.
  1. The waypoints 2DA is not an integral part of the world map functionality. It is deduced via scripting through the WM_GetWorldMapTargetWaypoint function in world_maps_h. All it does is go through the 2DA line by line to compare the area tags and then, get the waypoint tag. You can, instead write your own 2DA to put in waypoint tags based on plot conditions or specify a list of random waypoints from which one is picked to jump to (a diablo-esque dungeon with multiple entry points?) or if you have just one entry point in your areas, skip this 2da altogether, keep the area and waypoint tags same and use GetEventString(ev, 1) from EVENT_TYPE_BEGIN_TRAVEL for both.
  2. The first 2 integers in EVENT_TYPE_BEGIN_TRAVEL are used in the OC to determine random encounters based on terrain. That's not a hard and fast rule since random encounters are scripted and there are no core functions tied to them. What does this mean? Random encounters have to be entirely scripted by the module maker and as such, can be entirely different systems. In that case, you can use these 2 integers coupled with the waypoint changes above to get a more extensive waypoint handling system.
  3. Let's say you want to show something to the player - a written scroll with hidden clues (National Treasure, anyone?) or a picture clue. You could create a map with that scroll/picture and show that to the player with OpenPrimaryWorldMap (after setting it to the Primary map, of course) - basically, it can be used to show any image. 
I actually had a couple of other ideas but haven't explored the system yet to see if they would actually work. You think you know everything and then, the game throws a googly at you by hard-coding something within the engine or the GUI (the blight animation in this case).
I hope this tutorial proves useful to you. I will be posting the tutorial on the social wiki soon so if you find something that needs further explanation or if you uncover anything else related to the map-making process, please add it to the page. Feedback is also welcome here, if you need further clarification on any of the points above.

One last thing - the process to integrate custom world maps into the OC/Awakening is the same process as described in Part 1 of the tutorial. The only difference would be that you will have to intercept the above events prior to them being called by the official game and prevent them from being handled if you so desire. Since these are all module events, it is pretty straightforward to override them in your custom module script.

    Read More...

    Blood and Lyrium - Monthly Report  

    So, I decided to do some accounting today to see where I am at with the overall module progress. Seeing as my target is to release the module before Dragon Age 2 ships or more accurately, at least a month before Dragon Age 2 ships, the latest I can shoot for and still hope to have a decent-sized audience would be the beginning of February. That is just 4 months away and I still have a ton of work left to do!

    Levels: The biggest time sink for my module will be building the required levels. At this point, I've realized I cannot build every level I require from scratch so I'll end up reusing some of the official levels for the house/tavern/etc interiors. Sure, they won't exactly match up with the exterior layout in many cases but I think it is a small price to pay for an early release date. Even with that, I still have a few levels, mostly exterior, to create (it's unfortunate that none of the Community Contest entries really fit in with what I want):

    • Small exterior levels - usually as entrances to other areas or for encounters - 6
    • Big exterior levels - full-blown villages/town - 3
    • Interiors that cannot be reused from the OC - 5
    Given that, if I break up the work done so far and try to assign percentages (not really a good indicator but let's do it anyway)

    Story - 100% (I am really happy with this!)
    Quest Design - 80% (need to check the feasibility of certain ideas)
    Companion design - 40%
    Custom Classes and Abiltities - 30%
    2D Art - 0% (icons mostly but there are a lot of them + some other stuff)
    Level/Area Design - 80% (on paper ;))
    Level/Area Implementation - 25%
    Conversations - 20%
    Scripting - 10%
    Cutscenes - 10%
    Monster/Encounter Design - 0% (I should really start on this)
    Custom Systems - 20%

    Overall, I would say the module is about 20% complete. Now that the story is set and the overall quest arcs are almost finalized, I can start focusing on the implementation. Of all the things above, 2D Art is really not my forte - I will have to ask if anyone from the Community Creations forum can help out. I also wish we could hold an interior level Community Contest so I can get some free levels :p

    Plan for October:
    • Test and finalize quest design
    • Finish the custom classes' implementation
    • Finalize level design on paper
    • Finish the small exterior levels and at least one big exterior level
    • Complete quests/conversations/plots/etc for the areas designed till today.
    That is a pretty ambitious list, I know (*cough* I think I am coming down with something and won't be able to go to work for a week or so ;)) but if all goes according to plan (does it ever?!!), I hope to have an alpha of the first few areas out for testing so I can start getting some feedback. Here's hoping!

    One last thing I'd like to point out to potential modders (not just for Dragon Age) - Mengtzu has made an excellent post on encounter scaling and learning curves for the player when playing a module and how modders can try to avoid some of the pitfalls related to those. I will definitely be re-reading that blog post when I start my encounter designs and monster tactics.

    Read More...

    World Map Tutorial - Part 1  

    Well, I know we already have a Map Tutorial on the Bioware wiki (which will be updated shortly by yours truly) but as far as I know, no one has been successful in getting a custom map to work in a stand-alone module. Or, if someone did, no one has come forth on the forums to help those who've had problems. So, here is a step-by-step tutorial on getting custom maps to work.

    Step 1: Map Image

    The map can either be in .tga or .dds formats.
    TGA: You can use a freeware image editor like Irfanview or Gimp to convert a .jpg/.jpeg file to the .tga format.
    DDS: You can use nvdxt.exe present in the <Dragon Age Install folder>\tools\ResourceBuild\Processors folder to generate a DDS file. nvdxt.exe is a batch utility and to use it you need to open a command prompt (Start -> Run -> cmd) and enter your command. An example to convert x.tga to x.dds is:

    nvdxt.exe -file x.tga -output x.dds -nomipmap -8 u8888 -prescale length width

    -prescale length width lets you put in the size (should be multiple of 4) to which the x.tga should be scaled before conversion

    If you are using Photoshop, you first need the Nvidia Photoshop plug-ins and if you are using Gimp, you need the Gimp DDS plug-ins. In Photoshop, I saved my DDS as DXT5 ARGB 8bpp with Interpolated Alpha and No MipMaps.

    The game requires the image to be with the client's localized name but the toolset reads the actual image so you need both <image_name> and <image_name_en-us> (for English clients). You have to place both images in your addin's module\override folder.

    The game's world map (both OC and Awakening) is 912 x 687 pixels - this is the canvas size. The images have a 24 pixel transparent border which would make the actual image 864 x 639 (640 if you are using your own map)

    Why is this important?
    The map is anchored at the top-left corner of the book image and this corner is actually slightly above the book border. Without this transparent section, your map will never be aligned exactly in the center of the book.

    Sample map in add-in module with DDS extension
    There are ways to work around this but I will cover them in Part 2 if I am unable to figure out the transparent border.

    Step 2: Building the m2DAs

    You need to extend two 2DAs for the worldmap to function correctly in-game and create as many worksheets as you need based on the TargetWpTable entries (see below). All these 2das go into your module\override folder.

    worldmaps from worldmaps.xls: A few things to note here:

    worldmaps_tut 2da
    • The ID has to be between 0 and 255. Anything over that and the map will not work in-game and you will see the infamous grey square at the top left.
    • Bioware uses 1-5 for the OC and 10 for Awakening. I doubt the other DLCs use different world maps - if anyone has played them and has seen a different map, let me know.
    • The TargetWpTableID should match the IDs used to extend the m2da_base 2DA
    • The TargetWpTable entries should match the different worksheets containing the Source/Target waypoint information. I have yet to test whether this is actually used.
    • The MAP column contains the names of your map images
    • The Label column is the one used by the Toolset
    • As far as I can determine, the NameStrRef is not used anywhere so you can keep that at 0
    m2da_base from 2da_base.xls: Create a new entry for each of the TargetWpTableID used in the worldmaps 2da extension. Keep in mind that the m2da_base is, in itself, a m2da so you need to only have a worksheet with the new rows.

    source-target waypoint 2das: You can copy the existing target_wps_* worksheets and edit them if you so wish. It is basically a table with source and target areas on the rows and columns respectively. Their intersection contains the waypoint tag you will be transitioned to when traveling from the source to the target area.
    test_map_1_wp 2da

    Step 3: Setting up the map in the toolset

    This is probably the easiest part. Fire up the toolset, navigate to the Maps tab, right-click and select New -> Map.

    TIP: If you didn't know, going to the appropriate tab (Maps, Scripts, etc) and then selecting the New option by right-clicking there automatically positions the corresponding resource at the top of the menu. Selecting a folder and doing this creates the resource within that folder.

    If you've done the previous 2 steps, you should see the map name (Label) in the drop down list for the Map within the toolset and the image should appear correctly.

    To test what you've done till now in-game, just create a couple of map pins, save and export without dependent resources. Create a placeable using one of the Area Transition type placeables and set the PLC_AT_DEST_AREA_TAG to world_map (this is a hard-coded value inside the utility_h script). You can use any placeable for a transition but it is not as simple as this and I want to keep things simple till I start Part 2 of this tutorial :)

    Fire up your module script and add the following lines of code:
    #include "events_h"
    #include "global_objects_h"
    #include "sys_chargen_h"
    #include "sys_rewards_h"
    #include "world_maps_h"

    void main()
    {
        int nEventHandled = FALSE;
        event ev = GetCurrentEvent();
        int nEvent = GetEventType(ev);

        switch(nEvent)
        {
             case EVENT_TYPE_MODULE_START:
             {
                object oWorldMap = GetObjectByTag("<Tag of the placeable>");
                WR_SetWorldMapPrimary(oWorldMap);
                break;
             }

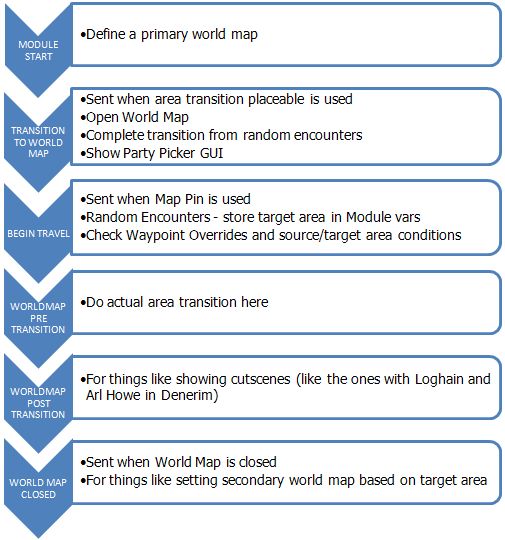
             case EVENT_TYPE_TRANSITION_TO_WORLD_MAP:
             {
                SetWorldMapGuiStatus(WM_GUI_STATUS_USE);
                OpenPrimaryWorldMap();
                break;
             }
        }

        // if this event wasn't handled by this script fall through to the core script
        if(!nEventHandled)
        {
            HandleEvent(ev, RESOURCE_SCRIPT_MODULE_CORE);
        }
    }

    Export the resources for your module, start Dragon Age and launch your module. Once you click the Area Transition placeable, your map should be displayed.

    Lastly, to show that this works with more than one custom map in the same add-in, another image. This one uses a .tga file as the world map and is bigger than the other one - just to show that there is no limitation on the size of the image - but you can notice the icons inside the map area -> the underlying book size is hard-coded.
    Sample map in add-in module with .TGA extension
    Part 2 of the tutorial will cover the scripting behind transitions, how to bypass/override certain events, customizations possible within the existing event framework and an explanation (or workaround) of the 24-pixel border. Stay tuned!

    I did my testing as part of my module so if any of you who read this run into issues or find something inadequately explained, let me know and I will see what I can do.

    Read More...

    Community Contest 2 Ends!  

    The second Community Contest to create one or more props for use in a level is now complete and the entries consolidated and uploaded to DA Nexus!

    Though we have only three entrants for this competition, two of them have submitted multiple props which should be nice additions for different kinds of level settings. We also have a cool-looking fountain from Mike for use in those upscale city neighbourhoods.

    Download and judge for yourself the contest entries here.

    While packaging the module, the toolset again exhibited one of it's many quirks - it can post level files which generates all those .rim files but apparently, it cannot package them up for distribution! You have to manually do that yourself.

    • Rename the .dazip to .zip
    • Extract the contents
    • Add a new env folder under the (addin-name)\core folder
    • Copy the posted level files into the env folder. Going by Bioware's example, just place the .rim files there. Don't package it into an .erf or the layout won't be available in-game.
    • Zip up the contents again - make sure the root contains the Manifest.xml and Contents folder or DAUpdater will throw an error while installing.
    It's a good thing the .dazip format is just a renamed .zip format - I cannot think how difficult it would have been had it been a proprietary packaging format!

    This highlights one of the problems David Gaider touches upon here - it's not a trivial task to package up a toolset for the community and test it and support it. I would go so far as to say that it is not restricted to the toolset alone but is relevant for any kind of modding capability. I just hope that when (if?) they do release a toolset update after DA2 (is anyone still hopeful that we will get a toolset patch before then? :p), it will fix some of the obvious flaws in the toolset.

    Read More...

    Marketing - Get the word out!  

    Continuing on from my previous post about the importance of marketing in the modding arena, I would like to touch/expand upon the means by which one can market our mods.

    How successful is my marketing?
    Blogs, as I've mentioned before, are a very good means of showcasing the development of a blog. However, I've found that when the blogs go beyond the standard fare - i.e., go beyond just the mod updates and include articles on inspirations behind the mod, design decisions, analysis of game mechanics, to name a few - I find them more enjoyable and the impression it creates of the author is better. One excellent example is Challseus' posts in July about the inspirations behind RoE. That made for a fascinating read - I was on vacation so I read through those posts later in one go but I can see how readers will want to come back and read more of those inspirations. It also lends some credibility to the modder; that they are not just changing things to be different but in fact have a good reason to do so.

    I actually penned a series of articles related to BaL's design and why certain things were being changed/added/removed but I felt that it would give too much of the game away and I had to stop after a few posts. There's that fine line between revealing too much thus destroying the element of surprise and revealing just enough to build up the anticipation for release and I've yet to find that sweet spot.

    The other important aspect is presentation; especially now when there are so many modules to choose from. It makes your content stand out - be it good screenshots (I'm guilty of taking too many dark ones myself), an attractive project page layout or a well put together trailer. If the presentation is good, it will automatically draw people's interest and then, you have to make sure that the content within stands up to that presentation ;)

    (c) designmind.frogdesign.com

    What are the other means by which modules can be promoted?
    Some time back, Mikemike37 suggested Twitter as a means for promoting my blog. The only time I've used Twitter so far is for the Bioware challenges during the infamous Bazaar event but I can see the potential there. It might be more so for a module like Baldur's Gate Redux since it comes attached to a familiar name but who knows! I'll have to get around to doing that soon...

    The other option - interviews! In the context of Dragon Age, getting interviewed on the Dragon Age Podcast is sure to get you and your module those few seconds of mass recognition which will, in most cases, translate to increased visibility of your module - more views, more downloads, more ratings.

    Well, that concludes my thoughts on marketing for now - this can easily change into a discussion about using social media for online brand marketing but that is an entirely different subject and too vast to be handled here! As always, I'm interested in hearing others' opinions on this subject.

    Now, if you've been reading my blog before, you would have noticed these last two posts are not the norm. I was recently interviewed by a thesis student doing his Masters in Communication in Singapore and one of the aspects of modding we talked about was marketing. It was a lengthy interview and a lot of time was spent on this subject which served as inspiration to post here - an evolution of the discussion we had, if you will.

    Read More...

    The Importance of Marketing  

    Anyone creating content - be it a video game mod/module, a home video, fan fiction or mobile apps, to name a few - realizes the importance of marketing or if they don't, should realize and respect it's importance. The ultimate goal of content creation is consumption by the public; a narrow demographic for certain types of content like video game mods or the general public for things like home videos.

    How do we get people to consume the content we create? Obviously, the first step is to make them aware that such content exists. Now, some modders might say (and I have heard this before) - I'll let my work speak for itself ; I don't need marketing. My question is - how will the work speak for itself if it is not even in the radar of the folks looking for such content? Alley of Murders, an excellent add-in for Dragon Age and if I recall, one of the first, had less downloads than other add-ins that were released after it. I think one of the problems was marketing.

    Granted, most hosting sites have methods in place to show new content that has been uploaded. However, when there is so much content being released on an almost daily basis, will that one day of visibility be enough? It will most definitely be enough for a very small amount of content - The Phoenix Armory for Females is one such example. An extremely well-crafted, beautiful armor set that doesn't look out of place in the Dragon Age world and it's already garnered over 200 endorsements in the past 2 weeks.


    It will also quite likely be enough for any content related to sex, as the BSN project page shows.

    How can we modders then ensure our modules - which have had hundreds of hours sunk into them - are given that visibility? How can we keep them in the public eye even during development so that we will have an eager audience waiting to play it upon release?

    One obvious method is to use signatures. Almost every module creator I've seen for Dragon Age has the project link in his/her signature bar. Signatures, however, are only effective if the module creator takes the time to post in a variety of forums - not just the DA Toolset forum, which is frequented only by other module makers and it is a reasonable assumption that they are already aware of your work. The task here is not only to maintain visibility to those who know about your project but also to pull in new people.

    The other option that works well in the BSN forums is the 'What's New' feed. Everything you post in your project page (be it private or not, hehe) and status updates are visible to your friends. Making regular updates to your project discussion pages and friends posting in groups/discussions related to that propagates those posts to the 'What's New' feed of their friends. It's a fragile chain to be sure but a chain, nonetheless.

    Blogs, I've found out, are really good tools for marketing. For one, there is the cross-promotion that happens as the "mod-blogger" community evolves - modders link to or follow other people's mods and this is usually reciprocated, resulting in increased traffic which translates into increased visibility. The other advantage is that visitors know that you are working on the module - especially when you post screenshots and provide regular updates on where development is at. Of course, stagnant blogs quickly lose the edge so you have to keep posting and updating your blog to keep the interest up.

    One common denomination among all the above methods is that you have to keep working on the PR front as well as doing the actual modding if you want to ensure your module is consumed by a large portion of the community.
    What do you think - is marketing necessary or are we over-burdening ourselves? Are there alternate means of promoting our content?

    More on this in the next post...

    Read More...